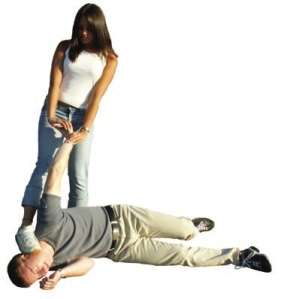
The Classic Headlock Position

The side Headlock doesn't get any more real than in a situation like this...

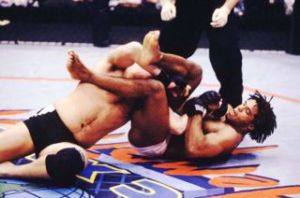
The side Headlock doesn’t get any more real than in a situation like this…

Now almost everyone has seen this position before whether it was in the school yard with a bully or in the backyard with some friends. An extremely common form of “attack” that untrained individuals find themselves using is this standing headlock. This hold can be daunting to someone who does not know how to escape from it but so easy to escape for one who does.

The Initial Contact

Because this is considering real attack situation, the attacker is not putting you in this headlock to give you a noogie. When there is malice intent it is always very important to protect your vulnerable areas as well as you can. From this position your face is the part that is most accessible to your opponent and most likely to be attacked.

Let us assume that the attacker grabs a hold of you with his left arm. To start to neutralize his striking your first priority is to protect your face with your own left arm. A first instinct is to use this arm to remove the attacker’s arm and free yourself but this is not all that likely to be effective and it will  take a lot of strength to break the opponent’s hold.

More importantly, your other hand can be used to take control of the attacker’s striking hand. This is done by reaching it around the back of the opponent and grasping his wrist and pinning it to his hip.  This is not only crucial to stopping the opponent’s strikes but also for performing the escape.

The Simplest Escape Ever

For as seemingly popular it is for one to automatically put an adversary in this headlock, the escape for it is very simple indeed. It requires only good body position and know how, there is really no strength factor in performing this escape. For as simple as this escape is, the famous Gracie BJJ family can teach you so much more about it.

Positioning

First and foremost you must get your body into the right position to effectively escape the headlock. Your grip on the opponent’s wrist is very important and should already be in place. Your other hand cups the inside of the thigh near the knee. Remember to keep your neck bulled as well to avoid this headlock from breaking your body positioning and compromising your strength.

During this whole process it is also very important to keep low and maintain a wide base so that the attacker cannot manhandle you easily. Now for the final positioning you need to be behind the attacker. Specifically the instep of your right foot should be placed right at the heel of the opponent.

Crumble to Escape

The next step and last step of this technique is to essentially crumble to the ground in such a way that releases you from the attacker’s grip. To do this you drop your own left knee to the ground and use your body weight to lower the opponent. Then you drag your opponent down with you as you fall off to your right side. As you roll on top of your opponent his grip is loosened and you can use your hand to free yourself from his grip.


Why Attack The Wrist?

The wristlock is perfect for fighting off an attacker thats superior to you

The wristlock is perfect for fighting off an attacker thats superior to you

In a real life self defense situation you need to deal with the threat as quickly and efficiently as possible; this is even more the case if there are multiple opponents and only one of yourself. Instead of trying to fight your adversary standing up, this technique allows you to take the fight to them, and to the ground. This can be extremely useful if an attacker is unskilled and unfamiliar with fighting from the ground. But also you average person probably has a better chance standing up fighting you rather than from his back on the ground anyway.

Attacking the wrist for a take down is a very smart thing to do. It attacks one of the attacker’s very weak joints so resisting is not really an option. Also this technique’s success is not affected by the size of the opponent you are facing, again because it attacks a small joint. 

Where to Begin

For this scenario lets assume that the attacker makes the first move and reaches out to grab or strike you with his fist. Catching a strike to secure his hand might be difficult and require luck or very good timing. But if the attacker is simply grabbing your shirt, this technique would work wonders.

Lets assume that the attacker has is right hand on your chest. To start to release his grip, you first grab his hand with both of yours. Then in a twisting motion, pin his hand to your chest turn your upper body to the right to break his grip. Then you reverse the twisting motion to turn his hand backwards and gain some control over him. Because of the nature of this grip on his hand you can essentially use his hand like reigns to control where his body goes.

Now, The Take Down

Using the new reigns on your opponent, you move his arm in a circular motion, over and slightly outwards, This shifts his upper body out from over the top of his legs, making him very unstable. The motion is not entirely obvious at first but after some practice one begins to realize how to control an opponent with this wrist lock.  Now You need to move through the opponent to knock him to the ground. You step through the opponent, with your left leg, to knock him back and further.

You= also use your right elbow as another point of contact to bring the opponent down. It is not a true muay thai style elbow or anything, more of you striking with the point of your elbow as you move through the attacker. But it is a simple, quick, and decisive blow to his chest/solar plexus that will give you the extra push you need to complete the take down. 

There are some variations of this take down that require a little more finesse and experience, but that also means they are more likely to fail. The simplicity of this attack is what really makes it great for a self defense situation. Also once you get your opponent to the ground, you are in a standing position over him. This is extremely beneficial, especially in a self defense situation because it gives you almost complete superiority in the fight as long as he stay in that position.


How Not to Get Hit

The concept of being able to submit an opponent rather than just beat him to a knock out was all the rage when mixed marital arts hit the main stream. However that does mean that getting knocked out is not a serious concern for a fighter as well. There are many defensive styles that are seen by different fighters, each offering its advantages and disadvantages.

Is There a Correct Defensive Stance?

Get a little creative with a tai chi stance

Get a little creative with a tai chi stance?

The short answer is no, there are so many styles and variations in this sport that there cannot be one “correct” way to do anything really. However, there are certainly some basics of a defensive stance that remain true throughout many different styles.

The basic idea of a good defensive stance should be obvious, protecting the vital areas, i.e. your head and ribs. The first step is to always keep your chin tucked into your chest; the quickest way to get knocked out is to catch that one clean punch to the jaw. Your hands should be kept up at all times as well, with your fists near chin level to protect it and your face from strikes. Your elbows are kept in towards your sides to protect your ribs from body strikes.

As a fighter grows and progresses he tailors his style to his own strengths and comfort. Lowering the hands provides more striking speed and uses less energy whilst giving up protection. On the other end of the spectrum, keeping your hands higher, towards your temple, gives you better defense while sacrificing some quickness.

Good Offense

Its an old adage that the best defense is a good offense, and this can apply to a mixed martial arts style as well. It will be awfully hard for your opponent to hit you if you are constantly on the offensive and he needs to worry about his own self-preservation rather than attacking.

This can be effective especially against very aggressive fighters. The idea is to take the opponent out of his comfort zone and make him fight on your terms, not his. Someone that is used to being on the offensive, and planning on being on the offensive, can get flustered with an unexpected offensive push.

Bob and Weave Baby

Another defense against striking in mixed martial arts is to avoid getting hit all together by dodging punches. Now this sounds extremely easy, and really pretty obvious, but it is a lot harder to do in real life. There are two advantages of using this style of defense, one you are not getting hit at all (in an ideal situation) and two it gives great opportunities for a  counter strike

This style of defense takes extreme athleticism and conditioning. Being able to time and dodge an opponent’s strikes takes a lot of training and experience; and a serious pair of cojones in some cases because potential knockout punches can be very close to landing. This style uses a lot more energy than blocking punches as well because of the constant movement. In addition if your conditioning is sub-par and you utilize this style, when you get tired and your timing starts to slip up it could be disastrous for you.

However this movement allows for the potential counter punch as well. After missing a punch your opponent will have one side of his body unprotected and may be slightly off balance. Using your dodging motion effectively is the key to effective counter striking. As you slip a punch you also load your body up to explode into the counter punch, hopefully ending in a clean strike.

The best example of this style of fighting can be seen in Anderson Silva. He is so good at this he makes his opponents look like fools when they try to hit him and then he can quickly land a knockout blow of his own. He uses expert timing, positioning, technique, and Badass-ness to do this so trying what he does is not recommended for the glass jawed. Here is a video of Silva explaining some technique.

Things You Need to Know

This guy doesnt look like he will escape the triangle choke

This guy doesnt look like he will escape the triangle choke

The triangle choke, its quick, effective, simple, versatile, its everything you don’t want a submission being performed on you. This choke is a basic Brazilian Jiu-Jitsu technique that is extremely effective in the mixed martial arts arena and seen very often. This means that a fighter needs to know how to escape one of these submissions rather well if he plans on lasting  at all during grappling.

Triangle Basics

Of course, first and foremost, the best way to defend against this submission is to not fall into it at all during the scramble or a sneaky set-up. The triangle choke is notorious for catching people when their limbs are flailing about when they are on top of an opponent and feeling confident. ALWAYS keep your arms close to your body to avoid getting quickly falling into this choke.

There are some great triangle set-ups that are extremely hard to defend, there are also so many variations that knowing how to defend them all can get very complicated. For example check out this ridiculous spinning triangle choke set up. However in this post defending the triangle choke in the classic full guard position will be covered.

Basic Stack and Turn Escape

After getting his legs around your neck, your opponent needs push his hips up and lock his legs down to complete the choke. Your first priority is to stop him from extending his body and raising his hips. To do this you grasp your hands together and put pressure on your opponents thigh.  Next you stack your opponent, which is driving your shoulders and chest into the opponents body. This stops the choke and limits the opponents motion on bottom as well.

After the choke is momentarily neutralized, escaping the legs is the next priorityt. You want to rotate around your opponent  to the side of opponent with the knee up. As you walk around you want to be in essentially a very low squat position and step your front side leg over the head of the opponent. This should release the opponent’s legs from around you and free you from the submission.

More Creative Escapes

The sit and pry escape works on almost the reverse principle as the stack and turn. As you stack your opponent you bring you legs up close to the hips of the opponent. You then sit your hips down and use your back strength to sit back and break the opponent’s legs from behind your back. This also puts you in a good position if you are good at foot and leg locks

The knee pry escape is another escape that relies on some strength to escape the submission. Instead of stacking your opponent straight on, you roll to the knee up side. From here you pin his leg to your shoulder, using your hands against his knee and quad. Then you drive forward at almost a 45 degree angle to the body of your opponent which breaks his leg lock from behind you.

The neck crank defense is not exceptionally technical but it is exceptionally mean. All you need to do is take your hands and grab the back of the opponent’s head. Next you pull his head up and towards you, putting extreme pressure on the neck and bringing the hurt to your opponent.


The Devastating Leg Kick

Urijah Faber's leg after taking some devastating leg kicks from Jose Aldo

Urijah Faber’s leg after taking some devastating leg kicks from Jose Aldo

Getting kicked in the legs is never fun, but in a fight it can be very harmful to let it go unchecked. There are many different things that leg kicks can do, all of which are detrimental. First of all your legs are your base, without your base you will crumble, simple as that. Powerful leg kicks can knock you off balance and lead to takedowns or knockouts. 

Leg kicks don’t have to have a knockout outcome to be effective either. Leg kicks cause serious pain to and eventually, after accumulating over multiple strikes, can seriously slow down the receiver. This can mean slower movement around the ring and slower reaction speed to strikes. In addition to this your striking power and explosiveness take a blow as well, no pun intended, because these attributes all derive their power from the legs.

Now Defending against the Kick

Defending against the leg kick involves not allowing your opponent to kick your thigh while maintaining your balance to be prepared for counters or follow up strikes. One thing to take heed of is that if you lean or step into the kick it will not have nearly as much power behind it. This can also give opportunities to grab the leg for possible takedowns. 

The Basic Leg Kick defense is a simple block that protects the whole side of your body. On the side of the body where your opponent kicks,you raise your knee up. At the same time you bring your elbow, on the same side, down to your thigh. This effectively blocks off your whole side from the opponent’s kick. The leg that is planted needs to be kept bent as well, to absorb impact and keep balance while you take the kick.

The elbow can block an attempted body kick that you misread, a misplaced leg kick, etc. However if it is a well aimed leg kick, it will connect somewhere around your shin. You can keep your lower leg loose and “catch” the kick near your foot, or take the kick higher by your knee. Getting kicked right in the shin is not optimal but is not the worst thing.

There is a derivation of this defense referred to as the Knee Block defense. Instead of keeping the block compact, your leg is put more outward and your knee, or very top of the shin, is specifically used to block the strike. This protects your body less but is a more pointed defense that can hurt your opponent more and leaves more opportunities for counter strikes.

Leg Kick Counters

Countering the leg kick can be a very useful technique to keep in your arsenal. Leg kicks are usually thrown quickly, but a quicker counter strike can catch your opponent very off guard.

One very effective counter, ironically  is a counter leg kick. When using the basic leg kick defense or a knee block defense your opponent gets stuck on one leg while kicking and replacing his that leg on the ground. By kicking this leg out you can easily bring your opponent tumbling down to the ground. Also you can use a caught leg to perform a quick crumble takedown. For some specifics on these counters to the leg kick CLICK HERE.z

NOBODY Wants To Be Injured

Being injured is always a hazard in sports regardless of which sport it may be. And of course no matter how you prepare there will be injuries because of freak accidents or unavoidable situations. Also there is a distinctive difference between being hurt and being injured. Fighting through “hurt” is doable, almost necessary to win any competition; fighting injured can be dangerous to your well being in the long run.

Preventing injury is therefor the best defense against being left unable to train and fight. If you do get injured, HERE are some ways to keep yourself ready for when you return . Below are some of those nasty unavoidable injuries that can happen during competition.

Injuries During Practice and Drilling

Always Stretch on the Beach before some MMA training

I always Stretch in the salt flats before some MMA training

There are also steps that you can take to try to prevent injuries before they happen so that you can avoid as much down time as possible. One should always warm up and stretch before training. Not doing this can lead to strained, pulled, or torn muscles and tendons. 

A pre-workout warm-up literally warms-up the muscles which help them work better in general. Also it helps the blood begin flowing into the muscles and the muscle cells  which allows their metabolism to work and produce usable energy for you during the impending physical  activity.

Stretching is another important pre-workout activity, although it is debated sometimes for sports in general. In mixed martial arts, especially grappling based martial arts, there is a lot of over extension of joints during submissions and weird body positions that one finds themselves in. Stretching prior to working out can help alleviate some of the sudden stresses felt by your tendons, ligaments, and muscles.  Stretching correctly is also important because overstretching can compromise muscle strength.

Live Training Injuries

It is also very important to realize the danger of the sport you are participating in. During training it is not one’s goal to hurt their opponent, but instead to better yourself in preparation for your next actual competition. Some submissions or strikes in mixed martial arts training do carry a degree of danger with them.

Submissions are designed to put pressure on joints to cause great pain; this pain is usually from something in the joint being about to break, tear, pop, etc. This means that when drilling these techniques caution must always be used. This applies when you are first learning the technique and are not familiar with its limits. Also during live training it is necessary to make sure you don’t get carried away or use unnecessary force against a friendly opponent.

In recent years the danger of head injuries has become much more apparent, especially the damage done by concussions. This effects you not only while the concussion symptoms are still present but multiple concussions can seriously affect mental function over time.   While sparring it is important  to wear proper head gear, and possibly try not to hit your sparring opponent with full force, even if he deserves it.

Slams, although cool looking, can be very dangerous in the same way as well. The classic slam can smack the back of the opponent’s head against the floor/mat and not give him any way to protect himself. Therefor they should probably not be drilled at live speed. 

Some Unexpected Advice

REST! Rest is a usually overlooked aspect of avoiding injury. Your body repairs itself while you are asleep. Also extended training puts a lot of stress on your muscles and  tendons, especially at a high level.  If you fail to get enough rest your body may not be able to keep up with repairs and give out on you unexpectedly. So remember always remember to get enough sleep to compliment your hard work.


Using the Leg Lock from Closed Guard

Close up action of a leg lock

Close up action of a leg lock

Successfully finishing a leg or foot lock in a mixed martial arts fight is not an easy task. Without very good technique your opponent could easily slip from your clutches and turn the tides of the fight in his favor. However being able to complete this submission successfully can round out a fighter’s submission game and give him a very sneaky weapon.

This leg lock setup will focus on finishing  from the closed guard position. When your opponent has you stuck in his closed guard your options are not always as open as you want them. many times fighters will fight not for submissions or sweeps but just to break your posture, hold you down, and tire you out while you fight for a stalemate. Quickly applying this leg lock can throw your opponent a curve ball and hopefully get you the victory.

Breaking Through the Defense

Usually if a fighter is on his back he will wrap his legs around you for the closed guard; there are also other techniques but this one is really the most common. His goal from here is to either submit or pass, you want him to do neither.

To start your attack you need to first unhook your opponent’s legs from behind your back freeing up your range of motion. There are times when a fighter will do this on his own, whether it is to attempt a sweep or maybe just a lapse of concentration. If you can perfect the leg lock it should only take this momentary lapse for you to take advantage and finish the opponent.

In reality though, we cant all be that good or that lucky. There is one fundamental closed guard pass that works great for this technique that is simple and effective. To perform this pass you need to posture up  in the closed guard with your hands on the opponent’s waist pressing him into the ground. One kneed is placed at the opponent’s tailbone and the other leg is stepped out and back. A simple twisting motion is used to break the opponent’s feet from your back and you are free. For an in depth explanation for this simple pass CLICK HERE

Positioning For Attack

Once you have broken through the guard of the opponent it is time to start pressing the attack. To get yourself in position, one leg is placed in between his legs almost as if you are kneeling down and pressing your shin into the groin. This help keep your opponent pinned down and prevents him from moving into you so that you can have the opportunity to grab his leg.

Your other leg is then swung out and around your opponent’s leg and onto his stomach to isolate the leg you are going to attack. You then also roll off to the side of the attacked leg. The knees are squeezed together to keep the leg from slipping out. The legs are also used to pin the opponent’s hip into the ground so that he cannot escape now that he knows what is coming next.

The opponent’s foot should now be in the vicinity of your armpit. The foot is gripped similar to the grip used in a guillotine choke, the arm on the bottom side is placed under the foot and the other hand is used to hold onto your hand locking the foot in place. This grip should be placed as close to the foot/ankle as possible because the higher you go on the shin the more pressure is diverted away from the foot during the finish.

The Finish

The finish for this submission is really an Achilles lock. It uses all leg strength to attempt to separate the opponent’s foot from the rest of him. Your arms are used to lock the foot into place against your upper body.  his hips/thigh are pinned to the ground and immobile due to your legs holding him down.

By using a squatting motion, pushing down with the legs, and pulling up with the upper body all the force is placed on the ankle joint and a tap out is inevitable. Mastering this technique is no easy task but it can certainly come in handy in a pinch.

Here is a video showing this technique in its entirety.

Counter Armbar

I know I wouldnt want to be caught in a Carlos Newton armbar

I know I wouldnt want to be caught in a Carlos Newton armbar

The arm bar is an extremely versatile submission in general. There are variations of it that can  be performed from a host of different positions. In general the arm bar gains its notoriety from really just how simple it is. In a fight, especially mixed martial arts, you are constantly using your arms to try and attack your opponent. This means that there is a lot of time when a fighter is focused on using his arms to attack and not deffending them, the perfect time to sneak in for an arm bar. 

This particular arm bar setup was used by Carlos Newton in a  fight against Kazuhiro Kusayanagi. He finds himself on top in a side control position and is immediately being hit with a Kimura attempt. Instead of letting the opponent finish what he started Newton, looking completely calm and under control, quickly made his opponent pay for this.

The Setup

The setup for this specific arm bar is very unique and pointed towards a specific situation. First though is that you are in side control position on your opponent. Once in this side control we are going to assume that the opponent is a Kimura lover and goes in for his submission attempt.

The Kimura is a shoulder lock submission that can be equally as quick as an arm bar if you get sloppy with your appendages. From the side control position your opponent will need to bring your arm up and over your back though which is not always very easy to do. This small gap of time in between when he isolates your arm and when he completes the submission is your time to strike, don’t be late though.

The Counter

The beginning is the do or die situation in the technique. submit or be submitted. To reverse this kimura and bring the hurt to your opponent is technically not very hard but practically not nearly as easy to finish as Carlos Newton makes it look.

First DO NOT let yourself get submitted. Next, your free hand is planted on the opponent’s hip and used as a pivot point as well as a means to separate yourself from your opponent’s body. From here speed and precision of movement are key to switching your position successfully for the finish.

To complete the arm bar you need to be on the other side of your opponent. To do this you walk your hips around on the head side of your opponent. The center of your hips should end up right behind the shoulder of the opponent. One leg is placed over the opponent’s head/neck to keep in pinned down against the mat. The other leg is left bent with the foot/shin pressing into the opponent’s side and up under his armpit.

From here all that is left to do is hold the arm to the body and raise the hips up to finish the submission.

Intangible Factor

There is certainly an intangibility factor to completing this submission. You could look at it and drill it until the cows come home. During a real match anything is possible and this move has a lot of variables and moving around. Also this is a counter move so by nature there is risk involved, for example if you mess up and the opponent simply finished  his submission. If you are going to attempt this move it needs to be done quickly, powerfully, precisely, and with confidence to finish successfully.

Here is a video with a technical explanation of this techique


Armbar From Behind

When engaged with an opponent, the back mount position will always provide security and dominance in the fight. the opponent has not real offensive options and can only try to avoid submissions and strikes or try to slip through your grasp. This armbar setup can be good during either one of these situations. It is a quick and powerful submission that can surprise the opponent from the back mount.

This armbar set-up was seen in the Palhares Vs. Salaverry fight where Palhares caught his opponent in this submission with, what apeared to be, flawless technique. He makes it look easy in the video below but this is a more advanced Brazilian Jiu-Jitsu move that takes much practice to use in a real match. With that said HERE is a link to a page with some information of the back mount position in general.

Setting Up the Armbar

Of course to start this submission you must first choose an arm to attack, for clarity’s sake lets say you decide to attack the opponent’s left arm. From a good back mount your left arm should be under the opponent’s left and your right arm should be over his right shoulder locking the opponent in position.

Now the right arm is removed and put on the left side of the opponent’s head and takes control of the opponent’s left wrist. Your left arm now reaches up from underneath the opponent’s arm, grabbing your wrist. This completes a Kimura grip, giving you control of the opponent’s arm.

To complete the submission your body needs to shift to the side of the arm that is being attacked so that the whole body can put force on it. To do this your legs need to shift first. The leg on the side of the arm that is being attacked is passed across the opponent’s waist. The other leg is swung behind the opponent, over his head, and placed across his chest to secure him.

The Finish

Finishing this submission is a piece of cake once you get the opponent on his back, it is getting him there successfully that is the challenge. To complete this submission there is a lot of shitting of position happening. Experience in BJJ and the back mount position help with that exponentially because of the sly and speedy change of position needed to avoid a counter.

The time where you shift from his back to the final armbar position is when your opponent is most likely to weasel his way out of the submission attempt. To avoid this speed can make the opponent not realize what happening until its too late if he is not very experienced. Also The leg that is placed across his chest needs to be placed there and stamped down with force to secure the opponent. By using this leg to pin the opponent to the ground it eliminates the possibility of him rolling into you to avoid the submission.

From here  the legs hold the opponents upper body to the ground while your arms hold his arm to your chest/upper body. The hips are raised up hyper extending the elbow and causing excruciating pain.

Below is a video explaining the technique from start to finish.

The Great Omoplata

A great Brazilian Jiu-Jitsu technique is the Omoplata. The original is a shoulder lock that uses the legs to rotate the arm and put pressure on the shoulder. This version is slightly different though. Instead of completing the shoulder lock, it is stopped halfway through and the submission’s finish is switched to a wrist lock.

The omoplata is a relatively advanced BJJ technique. It requires good technique and quickness to successfully finish in a mixed martial arts fight or BJJ match. However this move is a very useful technique for a smaller fighter who finds himself on the bottom against a  larger fighter.

Using an omoplata in a fight requires a lot of quickness and mobility. These are the attributes where a smaller fighter generally has an advantage over a larger fighter. This submission also has the advantage of removing your body from under the opponent which nullifies his advantage over you on the ground. CLICK HERE for more information on the small man’s technique in BJJ.

Omoplata modified

This omoplata is a very simple modification to the classic one. It attacks the wrist joint of the opponent instead of the shoulder, which is smaller, weaker, and easier to put pressure on. This technique was used by Royce Gracie against a Sumo Wrestler, Akembo. This fight is probably the ultimate example of how the Omoplata, specifically this version, can be extremely useful against a larger opponent.

Setting up the Wristlock

This setup requires you to start from the full guard position. The first thing you need to do is break your feet from behind your opponent and slide your hips out from underneath your opponent, lets say to your right side. Then your left foot is placed firmly in the front of your opponent’s left hip to hold him back for your next move.

Your right foot is then Swung around the opponent’s back and your foot is placed underneath the opponent’s head against his neck. This positioning gives you very good control over the opponent. Your legs and lower body have a huge power advantage over the shoulder of your opponent which gives you this control.

Now Your left foot can also be released. By rotating the hips the opponent’s shoulder can be pinned to the ground. This immobilizes the opponent and this gives you the opportunity to finish the submission.

Finishing this Omoplata

This setup can be finished in many different ways. Many of which focus on attacking the shoulder joint. However, as any BJJ practitioner could probably tell you, it is not always easy to finish the traditional omoplata against every opponent. This can be because the opponent is simply too big to move, ask Royce Gracie, your technique isn’t perfect, or the opponent knows a good counter.

However this modified finish can be much quicker because it does not require the additional position changed of the traditional version. To finish the Omoplata wrist lock the hand is bent forwards, such that his palm is forced towards the underside of his forearm. Both of your arms are used to do this, making it impossible to fight against the lock with the comparitively small muscles of the forearm.

Below is a video of this move from start to finish